scotieb24
Commish
11040 Posts
user info
edit post |
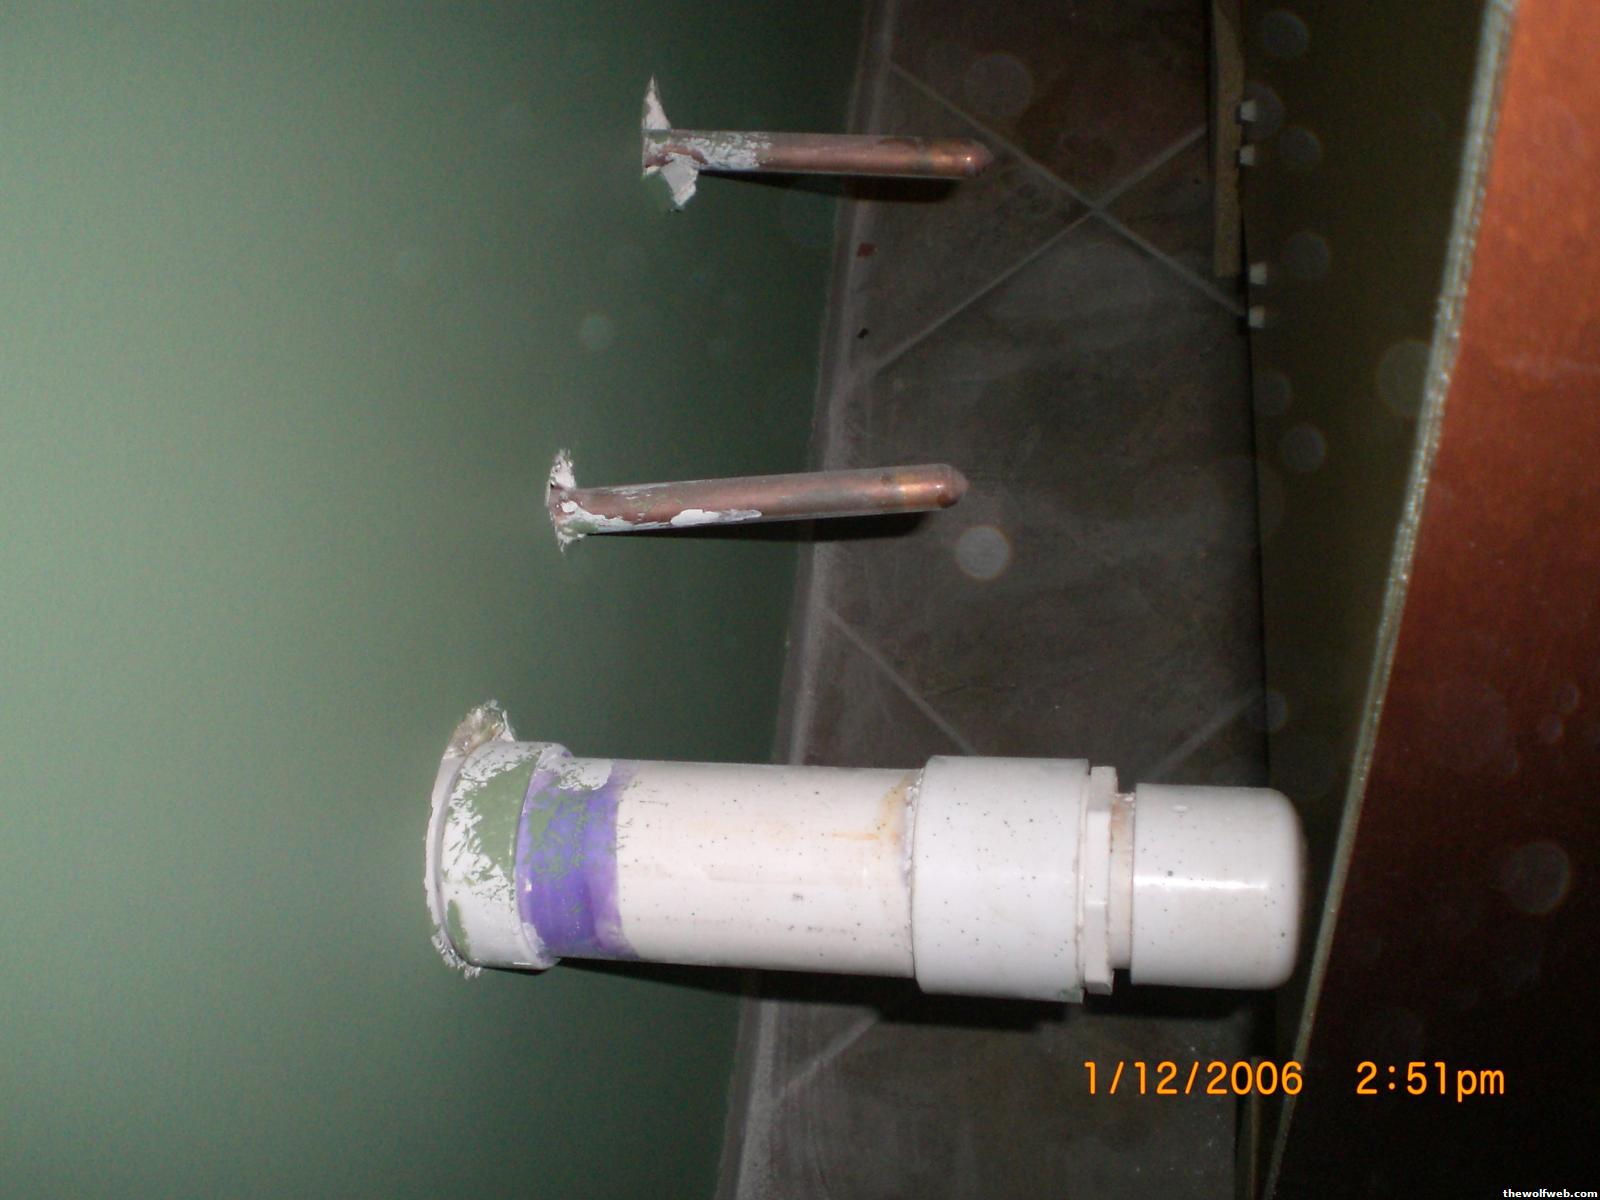
The plumbing was roughed in meaning that all of the pipes were already ran from under the house to upstairs. My boss at the time helped me install the toilet, sweat the water lines, and finish the drain pipes above and below the house. I got a quote from some contractor and I think it was $500.
Here are some pics of the bathroom beforehand.

  7/3/2012 8:57:25 AM 7/3/2012 8:57:25 AM
|
spydyrwyr
All American
3021 Posts
user info
edit post |
Great work man, really nice job. 7/3/2012 11:29:37 AM |
scotieb24
Commish
11040 Posts
user info
edit post |
Thanks. I'm very lucky to have great family and friends. No way I could do that on my own. It was fun learning about all the different parts. It also reminded me why I went to college because screw doing that stuff for a living. 7/3/2012 1:32:30 PM |
Wolfmarsh
What?
5975 Posts
user info
edit post |
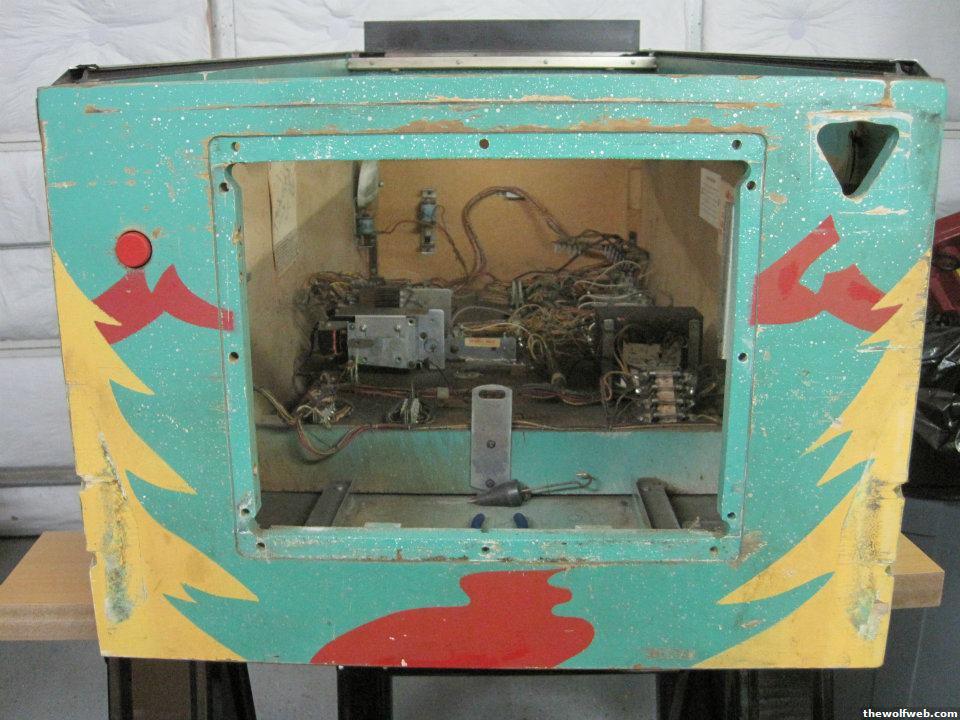
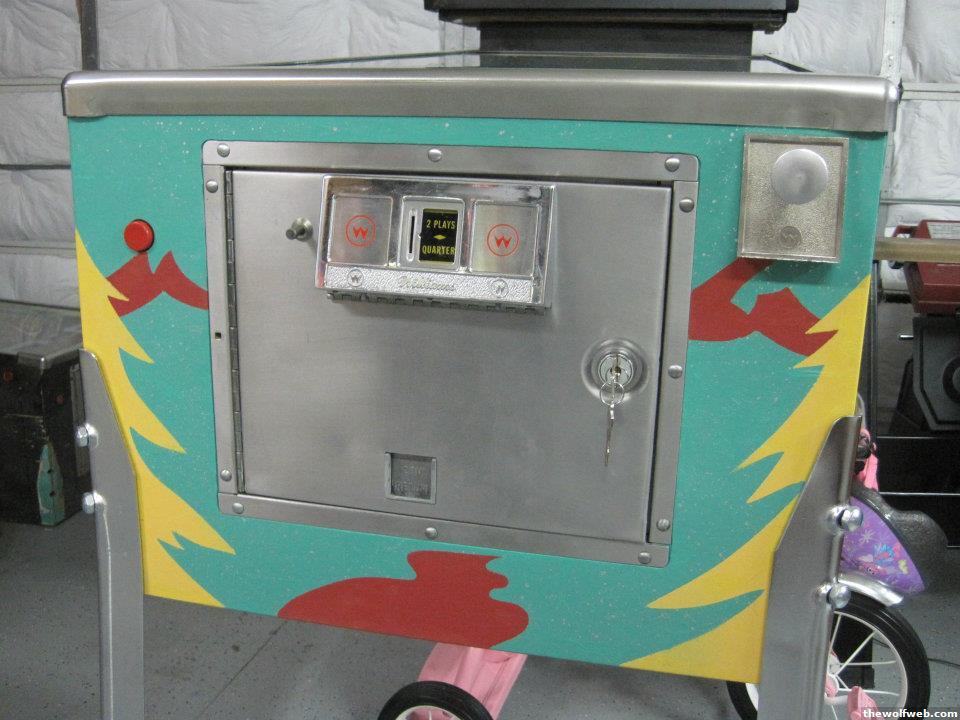
I restore and collect pinball machines as a hobby and this weekend finished restoring a 1971 Williams Yukon Special. I found it in someones barn, it hadn't been plugged in for over a decade the guy said. His brother had owned it and it got some water damage that they tried to repair in the late 90s and when they couldnt figure it out they gave up and shoved it in the barn.
It is an electromechanical machine, which means it has no transistors or solid state electronics in it. It is just a huge mass of relays and switches and wiring. It has a central score motor that has a stack of cog wheels on it, with a stack of switches on each cogwheel. This is pretty much the "program" it runs. Think of it like a music box. As the score reel rotates, the different cogs push different switches at different times.
At any rate, here is a pic of the front of the machine before I restored it, and after. The coin door and all the hardware is the original hardware that was on the machine, I had just already removed it before I took pictures. It was all rusted and beat up. This one had 3 different break-in's on the coin door. I had to pound all of it out.
 7/3/2012 2:45:24 PM |
wdprice3
BinaryBuffonary
45908 Posts
user info
edit post |
^are you for hire? I need one of my flippers fixed (really weak).
I'd love for the cabinet and backglass to be redone, but those may be too far gone (bad scratches on the backglass that took off the theme paint).
[Edited on July 3, 2012 at 3:03 PM. Reason : 1970s Chicago Coin Hollywood; website says 1976 http://www.ipdb.org/machine.cgi?gid=1214]
[Edited on July 3, 2012 at 3:06 PM. Reason : ^looks good, BTW] 7/3/2012 3:01:37 PM |
Wolfmarsh
What?
5975 Posts
user info
edit post |
I don't live in Raleigh, so I can't help in person, but I would be glad to help over PM.
Hit me up if you want some help. Let me know what machine, and ill give you the exact steps to troubleshoot, and what part to order. 7/3/2012 3:19:18 PM |
wdprice3
BinaryBuffonary
45908 Posts
user info
edit post |
Thanks. It's in storage right now, but when I move to my new place, I'll get all the information/pictures.
How far away from Raleigh  ? ?
I mean, if you have the time/want, and aren't too far away, and will restore the cabinet, etc. it may be worth it for both of us. 7/3/2012 3:42:38 PM |
Wolfmarsh
What?
5975 Posts
user info
edit post |
It's not really cost effective to restore them for money, but you never know.
Once you get some pics, find me.  7/3/2012 3:49:29 PM |
wdprice3
BinaryBuffonary
45908 Posts
user info
edit post |
haha, will do. I'm not restoring it to get anything back out of it, other than having it look much better. I realize this would be an expensive endeavor... just depends on how much in the end.
Thanks for the PM - I'll get the info later this summer when I move. 7/3/2012 3:51:28 PM |
djeternal
Bee Hugger
62661 Posts
user info
edit post |
I got laid off last Friday. Since then I have:
Completely finished the deck (including hauling all the demo trash to the dump, which really sucked in 100 degree heat)
Replaced siding near deck that had water damage
Removed, painted, replaced back door
Replaced screen in front screen door
Built 2 sawhorses
So far, here is what I have on my list of projects to complete (and it is growing):
Finish brick walkway along side of the house leading to the deck.
Seal deck (going to wait until August for this one)
Build a stand for my beehives
Raise the roof in the carport and replace the beams
Replace fence that was taken out by a tree
Replace fence around dog pen.
[Edited on July 6, 2012 at 10:48 AM. Reason : a] 7/6/2012 10:41:14 AM |
jbrick83
All American
23447 Posts
user info
edit post |
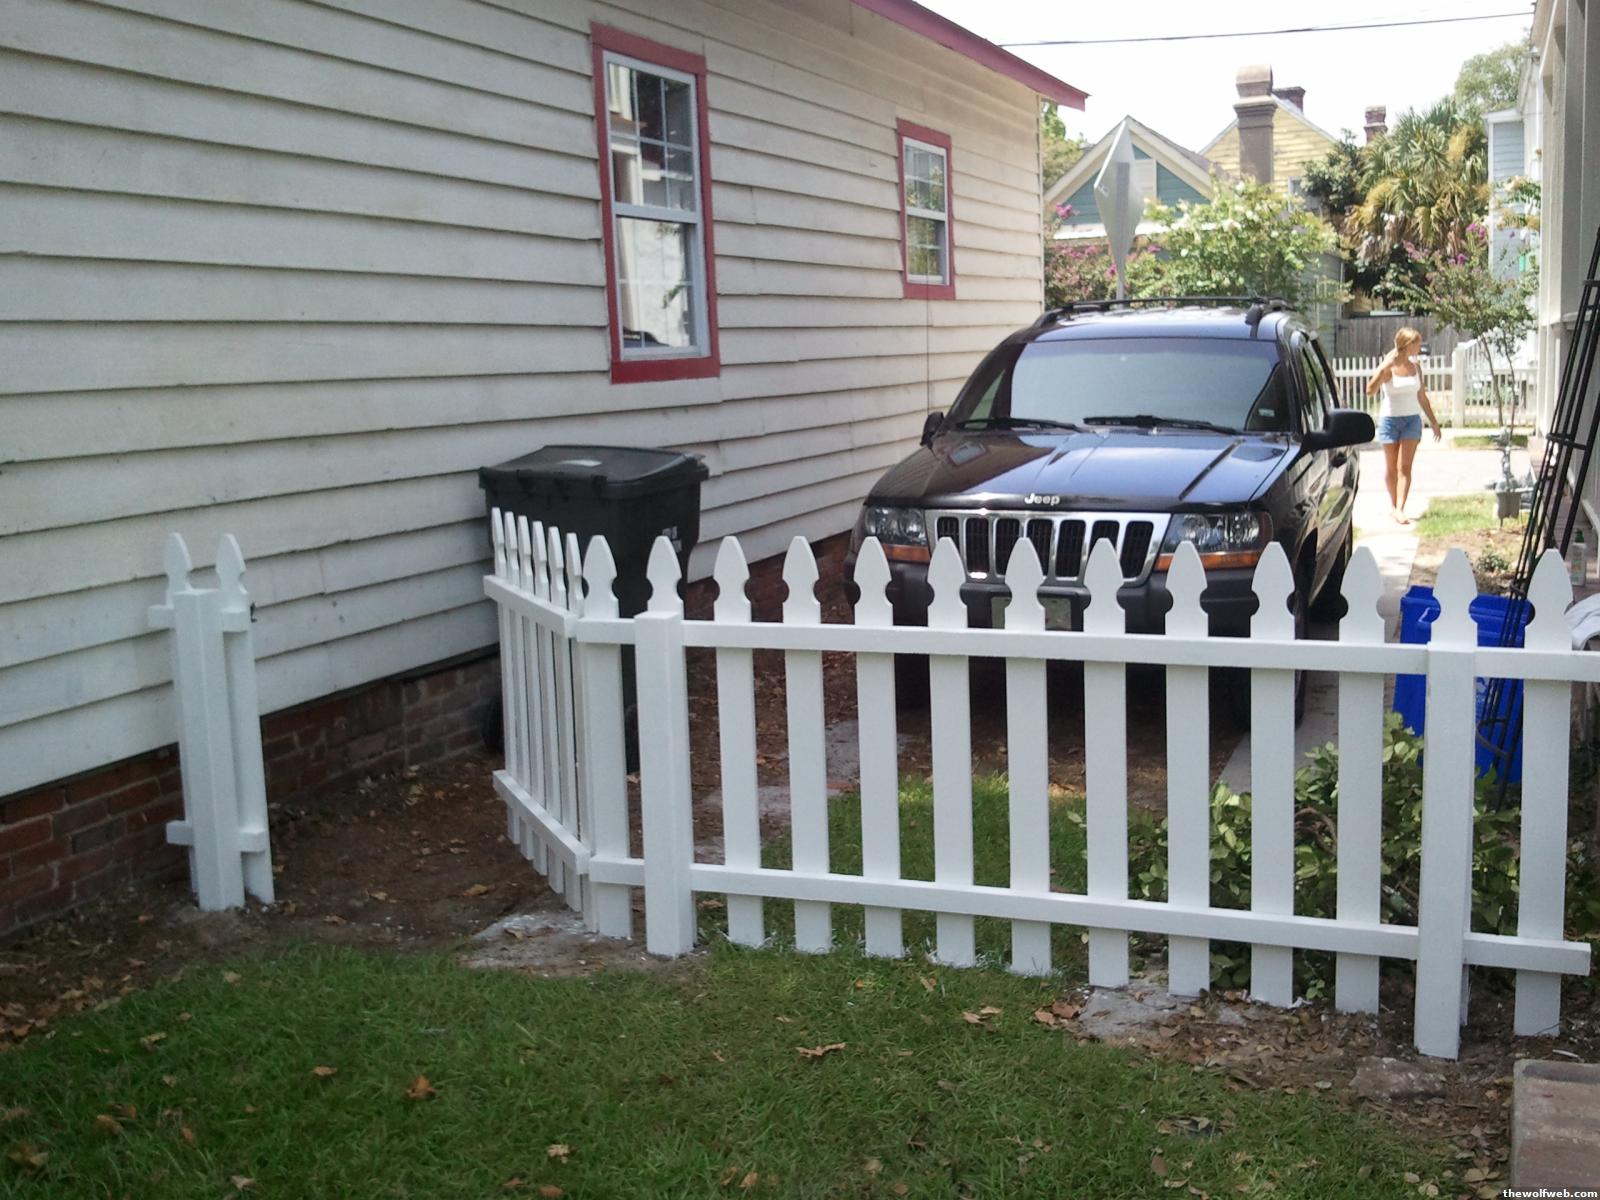
Built a small picket fence yesterday (13 feet long). Pales in comparison to a lot of stuff posted in here, but probably the biggest project I've done at my house so far. Had to do a decent amount of board cutting because Lowe's wouldn't cut shit. Had two 8-foot pieces that we had to size down and make a swinging gate/door out of. Had to dig three 2-ft holes for the posts and fill with quick-krete. Covered with primer after taking these pictures and will finish painting today.
We did this so that our yard is fully closed off now and we can let the dog roam without keeping an eye on him 100% of the time.
Very satisfying.

 7/23/2012 10:46:44 AM |
jbrick83
All American
23447 Posts
user info
edit post |
Finished painting the fence today:
 7/23/2012 10:16:55 PM |
poohpimpin
All American
636 Posts
user info
edit post |
looks good... the satisfying feeling is the best part 7/24/2012 4:17:02 PM |
Jeepin4x4
#Pack9
35771 Posts
user info
edit post |
jbrick, who is the hottie in the third pic? is that your neighbor? ever had neighborly relations? 7/24/2012 4:19:18 PM |
jbrick83
All American
23447 Posts
user info
edit post |
That would be the fiance. We have relations. 7/24/2012 5:11:15 PM |
jimmypop
All American
1405 Posts
user info
edit post |
I like the fence, but that'll be a pain to edge around. 7/25/2012 6:50:29 AM |
jbrick83
All American
23447 Posts
user info
edit post |
^ Was a concern of mine...but I took a weed-eater to it yesterday and it looked fine. I'm anal about my yard, so something may change in the future, but it will do for now. 7/25/2012 9:14:19 AM |
spydyrwyr
All American
3021 Posts
user info
edit post |
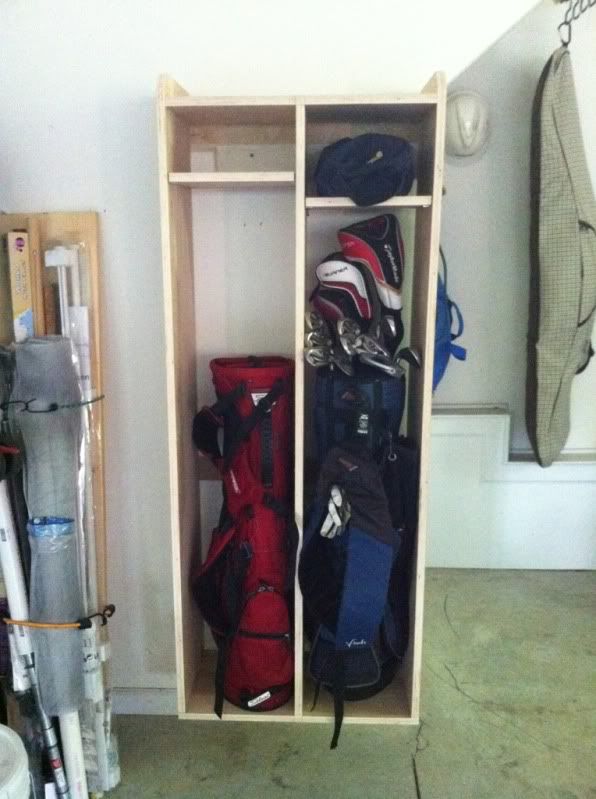
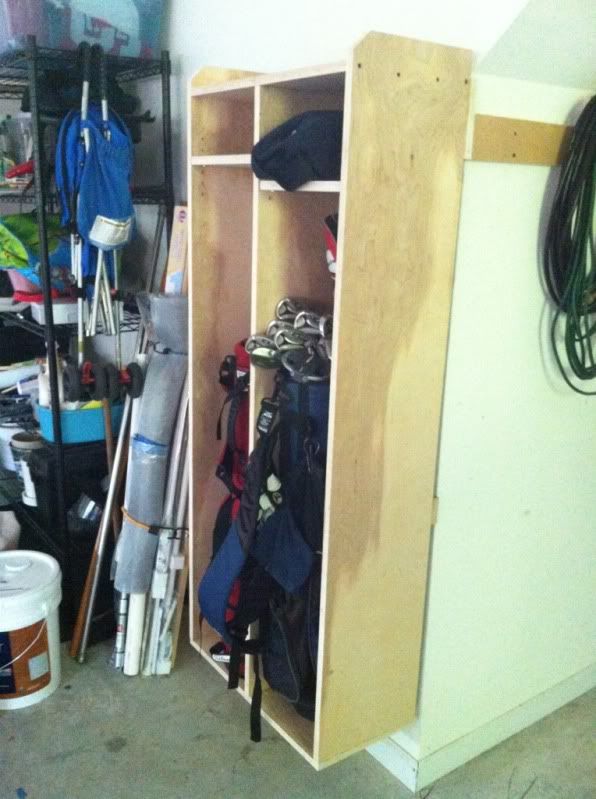
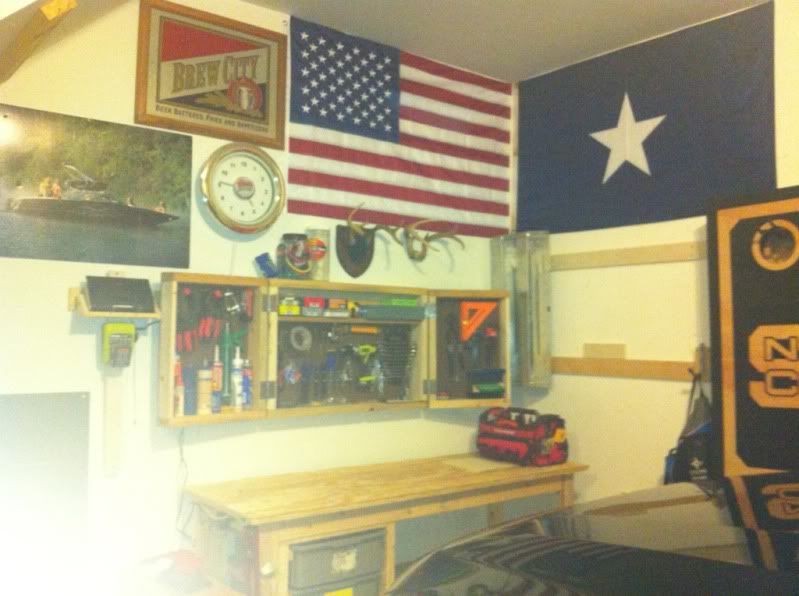
I've been doing some more little projects here and there to tidy up my new (to me) garage. All the cabinets and storage on the walls is made to hang on my DIY French cleat rail system so I can move and re-organize with ease...
Built a simple golf club cabinet:
Made a pegboard cabinet which I can close to keep dust off of frequently used tools (it'll be painted soon).
Closed:
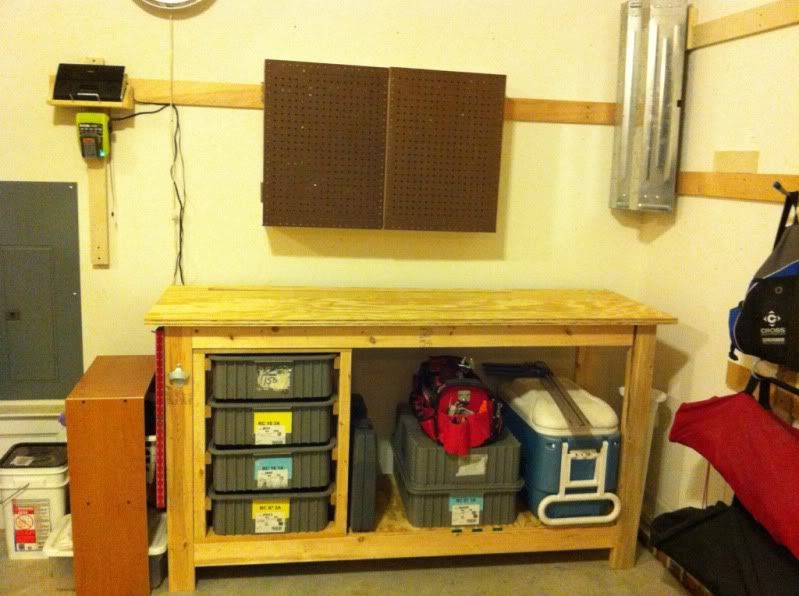
Open:
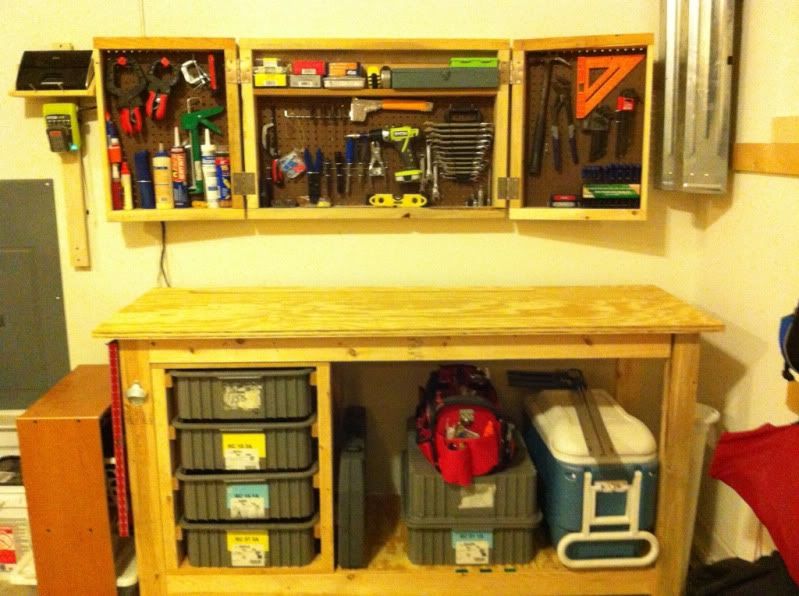
Here's a little more detail of the French cleat system for those unfamiliar - rip a strip at a 45 degree angle, mount to the studs with the slope climbing away from the wall, then mount opposing 45 degree angle brackets on that which you want to hang. Simple, cheap, and really strong.

Also not really a project, but hung some decor on the stark, boring walls:
 7/31/2012 8:46:07 AM |
YOMAMA
Suspended
6218 Posts
user info
edit post |
DONT TREAD ON ME!!!111!!!! 8/2/2012 9:37:39 PM |
spydyrwyr
All American
3021 Posts
user info
edit post |
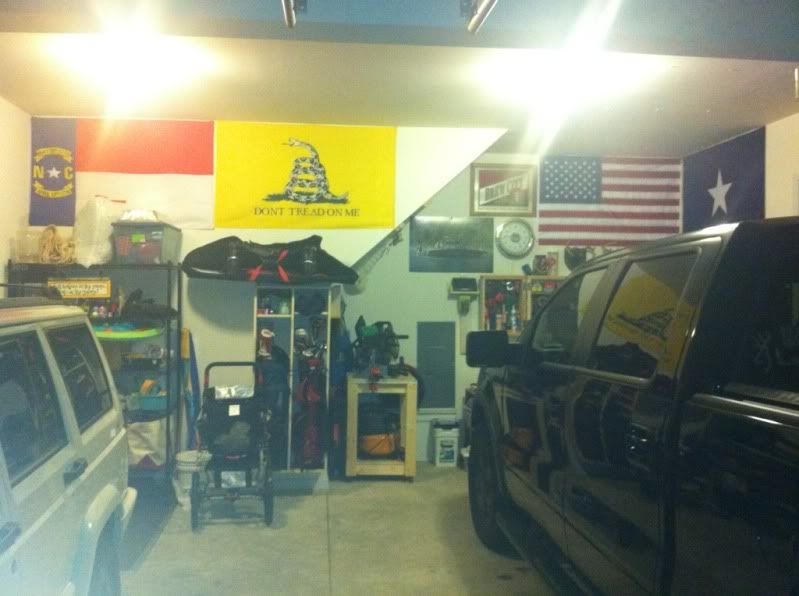
^I'm assuming that's a knock on my Gadsden's Flag? 8/7/2012 2:26:26 PM |
specialkay
All American
1036 Posts
user info
edit post |
^I think that is a pretty safe assumption 8/9/2012 1:04:22 PM |
spydyrwyr
All American
3021 Posts
user info
edit post |
^yeah i know  That was my coy attempt at fishing out what the particular criticism or mock was. That was my coy attempt at fishing out what the particular criticism or mock was. 8/9/2012 4:39:42 PM |
Jeepin4x4
#Pack9
35771 Posts
user info
edit post |
anyone have any tips to removing sections of baseboard molding?
i am going to install a 30"W vanity in my bathroom and need to take out that much of the base molding in order to fit the vanity flush to the wall. 8/14/2012 4:25:42 PM |
slaptit
All American
2991 Posts
user info
edit post |

hands down
8/14/2012 6:46:54 PM |
djeternal
Bee Hugger
62661 Posts
user info
edit post |
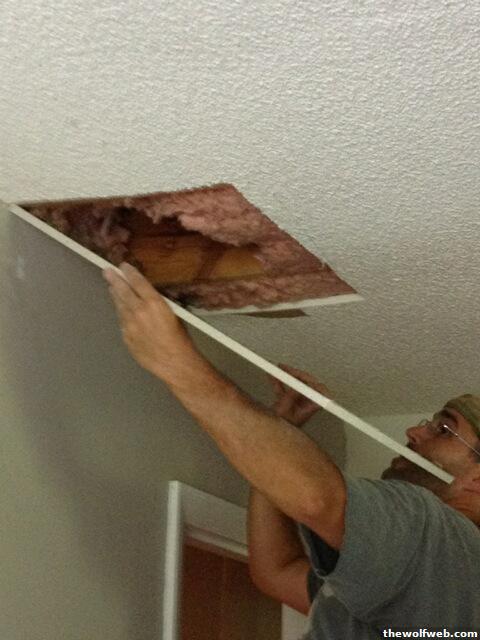
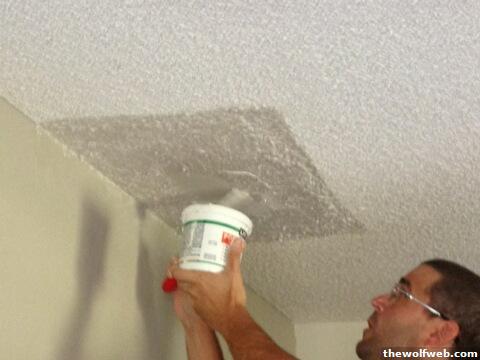
Made a wrong step in my attic and put my foot through the ceiling in the bedroom. Aside from fucking my leg up pretty bad, I now had a HUGE hole to fix. Got a quote from a contractor "friend" of mine of $500. Fixed it myself for around $20. Definitely not a perfect match, but that would be nearly impossible without painting the entire ceiling. So good enough for me!

 9/17/2012 10:59:21 AM |
CalledToArms
All American
22025 Posts
user info
edit post |
gg.
Has anyone ever reupholstered a lounge chair before? I'd like a high back or wing back chair for our reading room but since it wouldn't get used as often I don't know that I can justify buying a new one from a few of the brands I love. So I'm looking at getting one cheap and then reupholstering it.
It's been slow going try to find one on craigslist or at thrift stores or consignment stores (most of them are FUGLY), but assuming I do actually find one with a good shape, I already have an awesome fabric picked out. We used the fabric on a sofa in a different room but I'd like to use it again here.
The chair doesn't really have to be a wing back, I'm just looking for a good high back chair with some thought put into it. I LOVE this but it's way too much:

I am open to wing backs, as long as the wing portion is sleek and not super pronounced.
IE
 VS VS 
Anyway, I've just never reupholstered anything before so I'm not sure quite what I'm in for. I'll have to read up on some DIY blogs and watch some videos I suppose. Reupholstering seems like something that wouldn't be too hard as long as you have the patience and a little extra fabric on hand for your first time. I could be totally wrong though.
[Edited on October 29, 2012 at 11:27 AM. Reason : ] 10/29/2012 11:23:01 AM |
lewoods
All American
3526 Posts
user info
edit post |
You need to have a decent sewing machine to handle the layers of upholstery fabric. 10/29/2012 12:43:02 PM |
CalledToArms
All American
22025 Posts
user info
edit post |
good call. My wife's sister has a couple nice sewing machines. We might need to borrow them if we find a chair that's worth it.
Thanks
[Edited on October 29, 2012 at 12:54 PM. Reason : ] 10/29/2012 12:53:02 PM |
lewoods
All American
3526 Posts
user info
edit post |
Make sure she knows what the machine will be used for. Even some of the expensive machines have delicate plastic gears that can be damaged by doing too much sewing on heavy fabric. I'm still pissed off my mom traded in my machine and gave me her embroidery one that's "fancier" but has shitty gears in it. I'll eventually have to get an upholstery machine since I need to make a bunch of curtains for the new house and I don't have a machine that I feel confident in using for that.  10/29/2012 1:47:54 PM |
CalledToArms
All American
22025 Posts
user info
edit post |
gotcha. I guess it depends on what kind of fabric you use for the drapery. We don't have a lot of curtains but the ones we have are linen so they weren't very thick. We actually used the heat tape on seams except for the bottom that my wife sewed by hand. I wouldn't think they would have been a big issue if we did use a machine though either since they were light fabrics.
We definitely wouldn't want to be sewing upholstery by hand though (and really she would have preferred to use a machine on the curtains, but her sister lives 2 hours away and my wife just wanted to knock the curtains out when we got the fabric). I imagine that her machines could handle it though luckily but I'll definitely give her a heads up if we need to use it. She got a degree in Art Textiles so she did tons of sewing in college with all kinds of fabrics.
[Edited on October 29, 2012 at 2:21 PM. Reason : ] 10/29/2012 2:19:52 PM |
Jen
All American
10527 Posts
user info
edit post |
Still a lot of work to do but finally got around to this


I'm going to put a metallic sliver glaze on it, replace the knobs with glass, and outline the carvings in sliver but this was all I had time for today
[Edited on December 25, 2012 at 11:52 PM. Reason : no bump in old school? ] 12/25/2012 11:48:35 PM |
jimmypop
All American
1405 Posts
user info
edit post |
looks nice, are you painting the carvings or using silver leaf? 12/26/2012 12:37:55 AM |
Jen
All American
10527 Posts
user info
edit post |
Metallic paint on the carvings. I already have some that I've used on furniture pieces in the same room plus I haven't used leaf before. I have mantle I'd like to try the leaf on though
[Edited on December 26, 2012 at 12:46 AM. Reason : Kx] 12/26/2012 12:41:01 AM |
jimmypop
All American
1405 Posts
user info
edit post |
cool
leafing isn't bad, just time consuming and a little tedious. The whole gilding process looks nice when you finish. 12/26/2012 12:53:27 AM |
CalledToArms
All American
22025 Posts
user info
edit post |
Trimming 3 windows tomorrow. Cut and painted the trim today and just hanging it tomorrow. I'll probably try and hang the flat-board chair rail next weekend. Hoping I'll have this bedroom finished within the next month. 12/29/2012 10:39:37 PM |
CalledToArms
All American
22025 Posts
user info
edit post |
So we were much more motivated and productive than I expected. After hanging the trim on the 3 windows, we puttied, caulked, sanded and put a final coat of paint on all the window trim. We also painted the whole room above the center-line of the coming chair rail (below was already painted a few weeks ago), painted the blinds in all 3 windows, cut and hung 2 shelves, and hung the mirror I picked up over the break.
Still planning on tackling the flat-board chair rail this coming weekend, but I'm not sure we will finish the whole room within the month with other things we have going on now. I still have to work on a big piece of art to go over the bed, modify or make a large leaning mirror, install a wall-mounted bookcase, and put together the actual bed frame and head board. 1/2/2013 10:13:34 AM |
ctnz71
All American
7207 Posts
user info
edit post |
message_topic.aspx?topic=633839
laminate floor. would be a nice easy cheap DIY project. 1/3/2013 3:55:06 PM |
CalledToArms
All American
22025 Posts
user info
edit post |
Not a bad price at all if someone is looking to do a cheap bedroom update or something 1/3/2013 4:01:46 PM |
ctnz71
All American
7207 Posts
user info
edit post |
its $1.5/sqft new
its like 320sqft i think. would more than likely do two bedrooms or a living room. would need $40 worth of underlayment. i have 1/4 round to match. 1/3/2013 4:15:58 PM |
lewoods
All American
3526 Posts
user info
edit post |
Good deal for someone that needs it. If you have allergies I can't tell you how much it will change your life for the better to ditch the carpet in the bedroom. The bedroom was the first place where we ripped out the carpet and I've been able to quit taking allergy meds. After spending a week at the in-laws with an old comforter (should have snuck it out to a laundromat) I've been having sinus headaches for several days after we left. 1/4/2013 9:46:57 PM |
ncsuapex
SpaceForRent
37776 Posts
user info
edit post |
Carpet is the nastiest thing you can put in a house. 1/4/2013 9:49:02 PM |
lewoods
All American
3526 Posts
user info
edit post |
It was completely disgusting seeing how much nastiness was under the carpet when we ripped it up.  Eventually the whole house will be wood and tile, and I'll be so happy. Next up in the project queue is finishing the tile in the kitchen and then putting the baseboard back up in the kitchen, dining, and master bedroom areas. Eventually the whole house will be wood and tile, and I'll be so happy. Next up in the project queue is finishing the tile in the kitchen and then putting the baseboard back up in the kitchen, dining, and master bedroom areas. 1/4/2013 10:38:25 PM |
smoothcrim
Universal Magnetic!
18917 Posts
user info
edit post |
how difficult is it to put this laminate wood in? I just bought a place in VA and it's got 80s carpet in it. I had it steam cleaned but it didn't clean up as well as I'd hoped. I'd also like to run a lot of wiring under the floor. do I just cut the carpet and take up the tack strips? 1/4/2013 10:49:41 PM |
lewoods
All American
3526 Posts
user info
edit post |
Regular laminate is an easy DIY project. Hardest part is around the doors (have to cut the boards and door jambs). At that price point it's floating, so no nailing down required. 1/4/2013 11:01:31 PM |
djeternal
Bee Hugger
62661 Posts
user info
edit post |
I am currently working on finishing a brick walkway that was half-finished by the douchebag that lived here before me (my GF's ex). Finished off the rock retaining wall, laid out steps, and fixed some areas in the existing brick where sediment had washed out from under it. I will post pics when I am finished.
Now I have a question for those of you with experience in concrete. I have to pour concrete steps at both ends of the walkway. Is it too cold to do that now? I'd really like to get it done before I go back to work in 2 weeks, but a lot of people are telling me to wait until the spring. 1/5/2013 11:03:06 AM |
smoothcrim
Universal Magnetic!
18917 Posts
user info
edit post |
needs to be >50* for at least 2 weeks to cure properly. it might come out ok depending on the mix, but it'll likely crack or have poor sealing (where that nasty powder comes up) 1/5/2013 12:39:28 PM |
shoot
All American
7611 Posts
user info
edit post |
Fixed a oven without baking function. I ordered the ignitor online and changed it after watching howto vid. It saves me 140 bucks. 1/14/2013 11:46:59 PM |
spydyrwyr
All American
3021 Posts
user info
edit post |
Couple of quick projects I thought I'd share.
I built a picnic table for a buddy of mine. I used pocket hole screws for everything, so you can't see any fasteners at all, except for the carriage bolts to attach the legs and the stretcher lags. He sealed it with a tinted sealer and it looks a l lot better now, but here it is just after assembly, pre-sealer. I think it turned out pretty nice for $120 and 4 hours work.
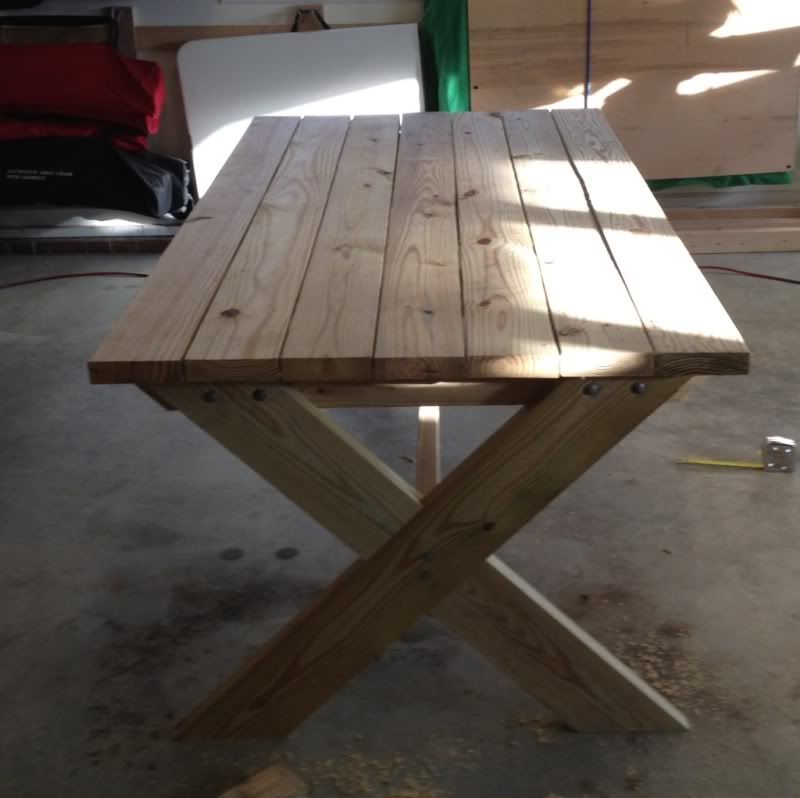
Last night I built a shoe rack for our garage for work boots and old shoes and whatnot. I used the French cleat method that I have all across my garage so it's easy to move around when/if I want to. Not bad for $20 and about 2 hours work.
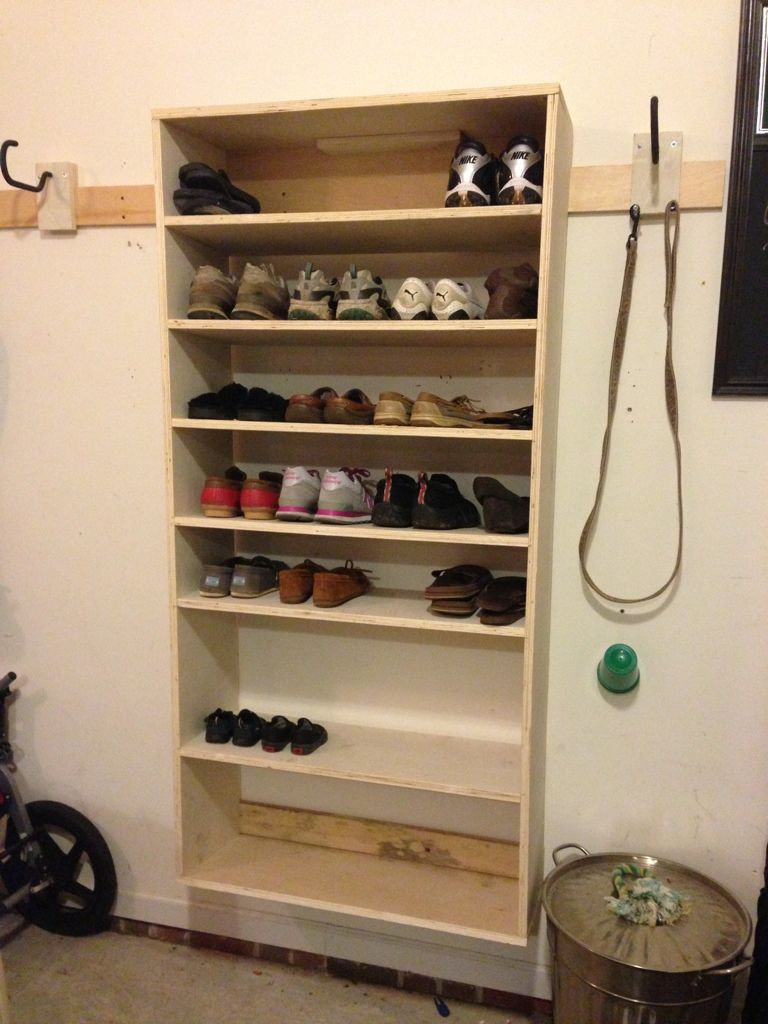 2/12/2013 10:16:30 AM |
nacstate
All American
3785 Posts
user info
edit post |
Did a write up on a little project I did this weekend.
zipties FTW.
http://www.castillo-crews.com/let-there-be-light-diy-light-fixture-project/ 2/12/2013 2:37:55 PM |
Wolfmarsh
What?
5975 Posts
user info
edit post |
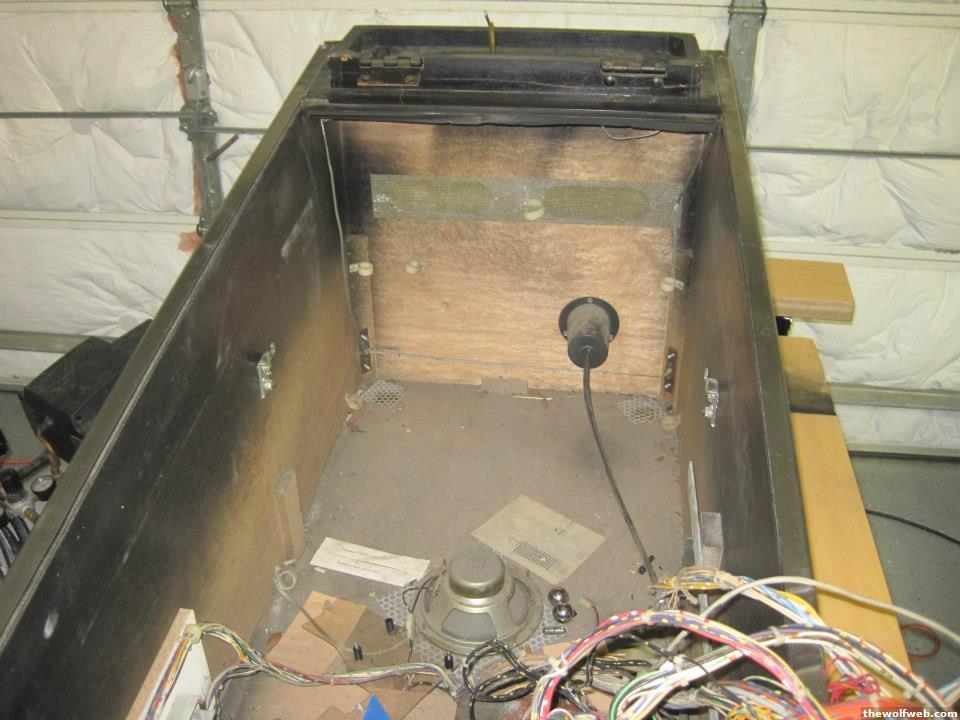
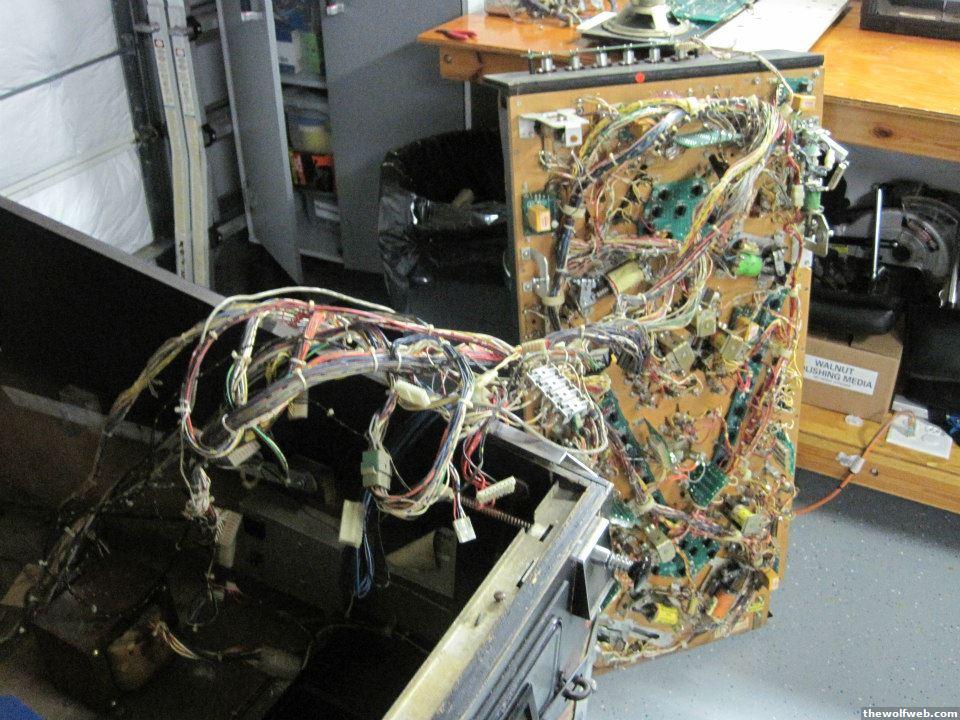
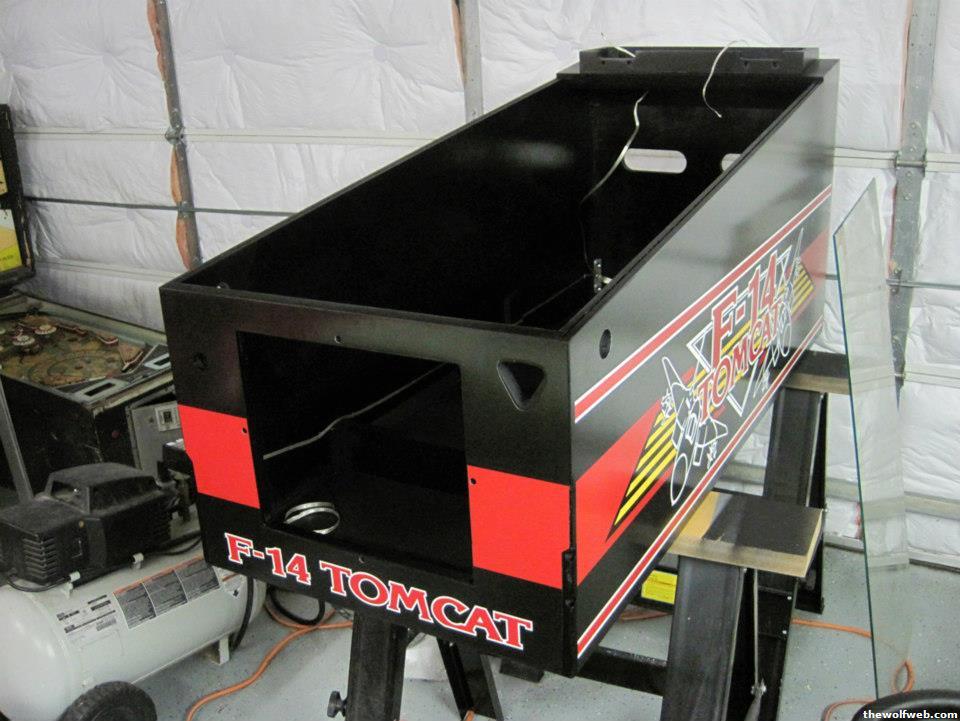
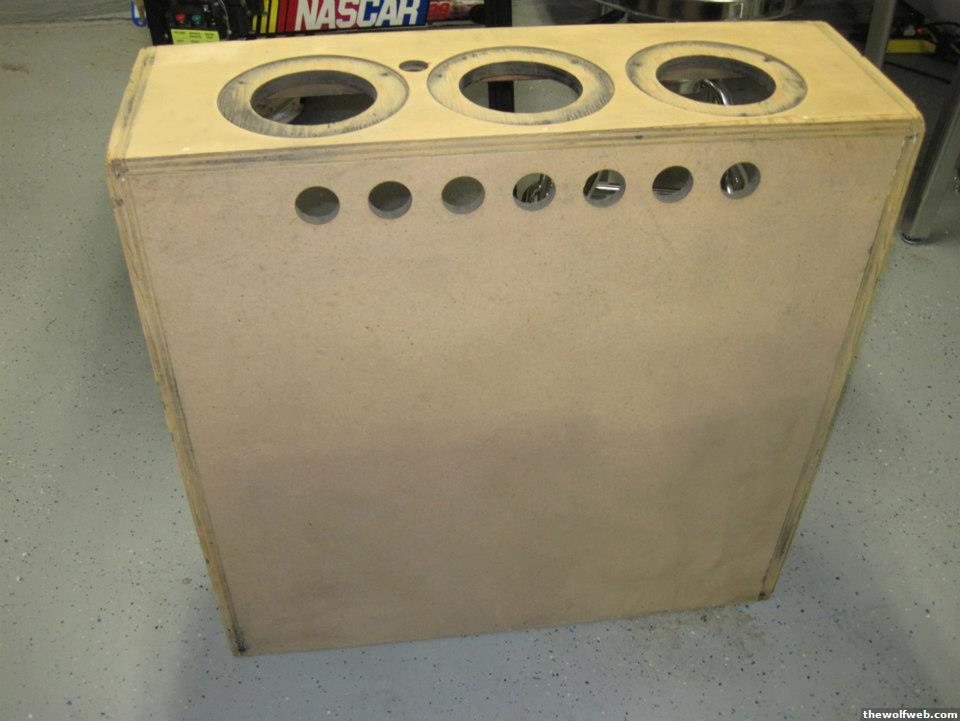
I've been working on another pinball restoration. This one was pretty bad off.
Here it is before I started restoring it, its really screwed up.

The inside of the cabinet:
The playfield pulled out:
An example of all of the labels I have to remake in photoshop:
The cabinet with all the parts off:
Sanded to bare wood:
Primed:

Filled/sanded:
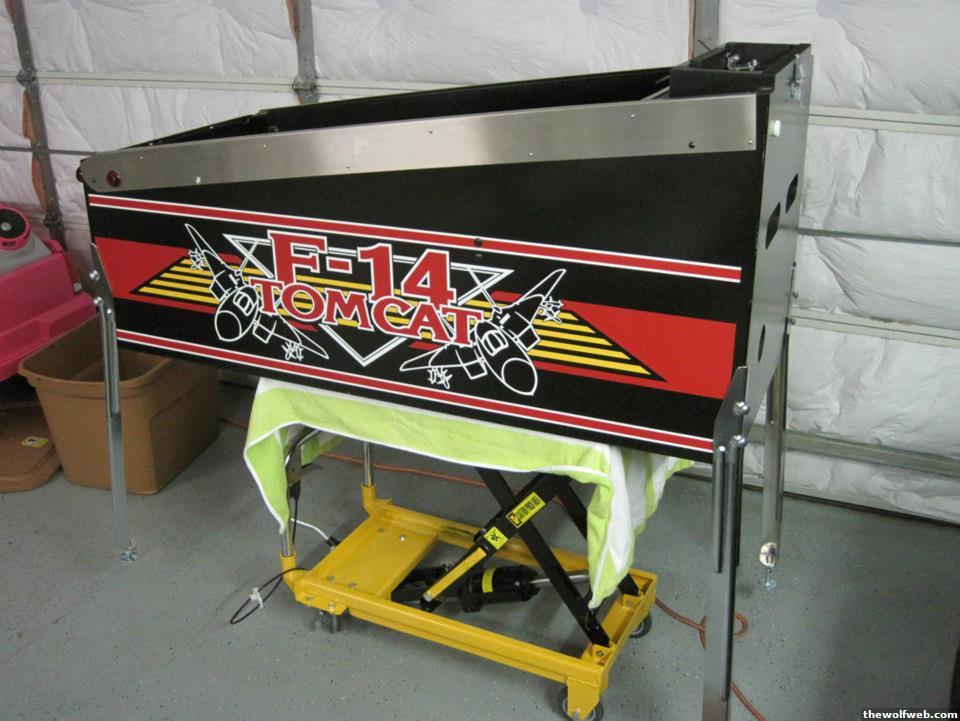
Painted, graphics on, and starting to put the ground strap back in:
New siderails and legs are on:
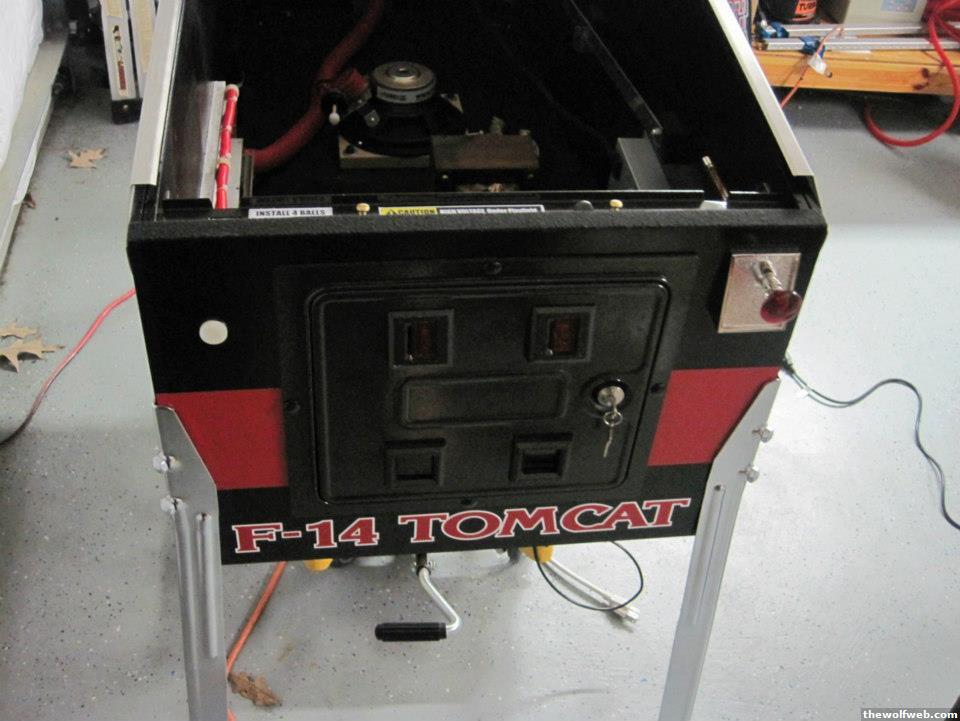
Coin door, plunger, start button, and a bunch of the guts back in:
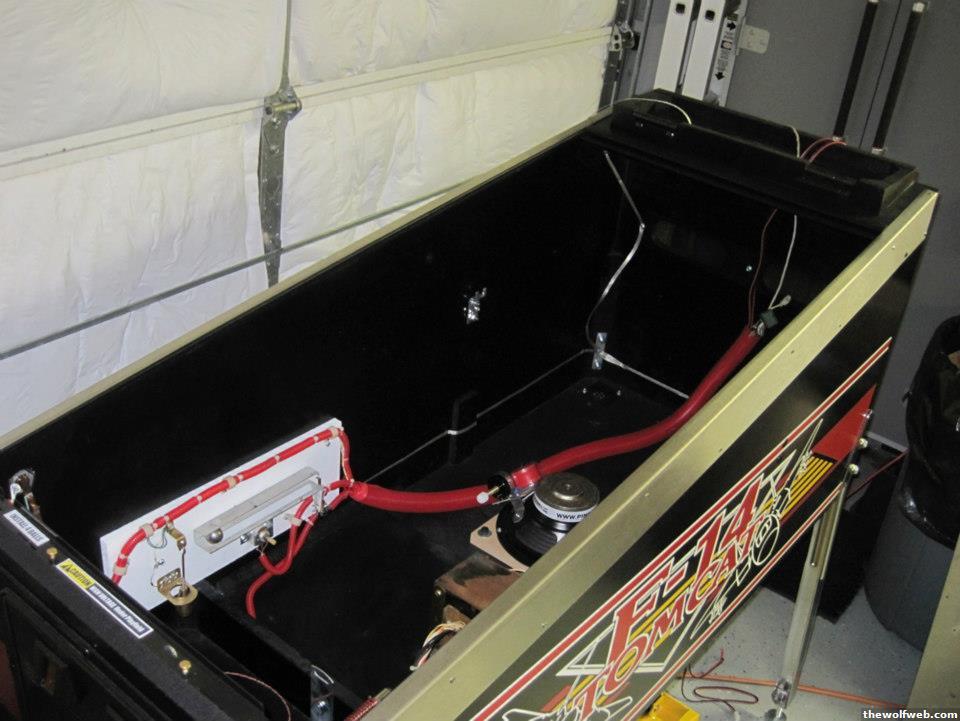
More of the guts back in, including upgraded subwoofer:
The backbox sanded to bare wood:
I have a lot more work to go, and will post some more stuff as I make progress on the playfield, etc.. It's been stripped, all the artwork has been repainted by hand, and then clearcoated. Working on putting the thousands of components back on it now, as well as painting/fixing the backbox/motherboards.
[Edited on February 13, 2013 at 9:37 AM. Reason : .] 2/13/2013 9:33:42 AM |